Generalities

This software aims at recording activities and logging time for the purpose of managing the work done and to be done at the tax and accounting office.

Tax and accounting activites must be performed in the appropriate software from which the status may be synchronized or reported here.

The goal consists in maintaining a pertinent list of tasks for customers, individuals or entities, so that work may be prioritized and listed appropriately for employees to perform in a timely manner.

Login

Each user is assigned credentials to access the system. Make sure that you are using your own credentials at all time.

Once you log in, you will be assigned a key that identifies you for each transaction. It will authorize or deny access to data and areas of the website.

You will be automatically logged off after 30 minutes of inactivity. Each time you do something, the software will keep track of it and your activities as well as the time during which you use the system will be accessible. This does not mean that your performance will be measured by the intensity of your usage of the system.

The home page is accessed immediately after login and by clicking on the company logo, in the top right corner.

Home Page

The home page is made of several components, some of which will be accessible in every page, while others are only available on this page.

  • Permanent Access
    • Link to the home page the upper left icon of the company is a link to the home page.
    • Customer Search is an area where we can look for a customer, individual or entity, by entering a few letters from anywhere whithin the name. See below for more information.
    • Employee's Tasks are accessible through clicking on the word "Tasks", next to the Customer Search area. See below for more information.
    • Help this page is accessible through the "help" icon in the upper right area of the screen.
    • Name of logged in user is displayed in the upper right area. Make sure that it is your name that appears there at all times.
    • Logout is achieved by clicking on the link in the upper right area.
  • Page components
    • Menu buttons are the key to accessing all the available pages.
    • Notifications are listed for all employees to see. See below for more information.
    • Assignments are internal tasks that do not have anything to do with the company's core business. See below for more information.

Customer Search

The Search bar is permanent, which means that it appears on all pages. Get started by typing a few characters, which can be found anywhere in the name of the person or entity as follows:

  • Individual
    • Taxpayer the First Name, Middle Name, Last Name or 2nd Last Name of the Taxpayer
    • Spouse the First Name, Middle Name, Last Name or 2nd Last Name of the Taxpayer
  • Entity the name or DBA

The result of the search is a list that may contain customer from the 3 types. An icon indicates the type of result.

3 icons follow each customwe:

  • displays basic information about the customer on the right side of the panel.
  • is there to use the customer in the current popup form.
  • will take the user to the customer's page.

Tasks

The summary, as well as the list are refreshed every 10 seconds but do not count as an activity towards the user's log.

Clicking on the work Task will open a panel on the right side of the screen with the list of Tasks.

Tasls are listed with the most recent on top.

Tasks are compiled from the assignment of all Communication, Transaction, or Customers item with an active status.

Clicking on a Task will take the user to the corresponding customer's page.

Access

Access to pages and functionalities is regulated by the role of the user.

Notifications

Notifications are simple messages that will appear for all employees on the home page until they are turned off for an employee by setting the notification as seen.

To do so, click on the icon

A popup message will appear, asking you to confirm that the notification has been seen

The notification will not appear anymore, but it will still be availanle on the list, whcih can be seen below.

Assignments

Assignments are tasks created internally for users to perform, outside of the customer-related tasks.

Only tasks assigned to the employee will be displayed on the home page.

The form shows the details for the assignment, but managing it, like changing its status or adding notes is done through the Assignment page as seen below.

Adding, Editing, Viewing and Deleting data

Most pages allow for the addition of new records, editing, deleting or viewing more details about existing records.

Editing may be different from creating, as certain fields should not be changed once they are set. It is the case for the assignment to a customer, for example.

In the case of errors in the unchangeable fields, the original record should be deleted and a new record created.

Creating a new record may imply the creation of more than one record in the database, as the data can be used to create a record in different tables. In this case, when an error is committed, the records in all tables involved will be required.

In many forms, the Customer is set by using the icon, which puts the cursor in the Search Bar. Clicking on the will bring the Customer's information into the form.

  1. Click on the to be redirected to the Search area
  2. Type to search the Customer
  3. Click on the to capture the Customer

In many forms, values may be selected from a list. When the last option is Other, an input will appear to the right to allow the capture of a new value. The new value becomes then available in the futur as a valid option.

Notes

Notes can be made in many places in the application.

In most cases, they will not show up directly in the lists or forms, but rather when viewing further details or through a universal popup.

Such notes will be represented by icons:

  • indicates that no note is present in the record.
  • indicates that there is 1 note present in the record.
  • indicates that notes are present in the record, and the number provides information on the amount of notes..

Clicking the Notes icon causes a popup to show the content on the right side of the screen

Notes will also typically allow users to signify that they have seen them, by use of the icon.

The icon appears on Notes left by other users only, and if they have not been marked as seen yet.

Clicking the icon will replace it by the initials of the user, to be seen by all.

Administration

The Administration section is only available to users who have Administrive rights. The documentation carries it for users to understand how things work behind the scene.

The main page of the Administrative page consists of buttons to the several components of the Administrative tools.

Roles

The roles are created to separate users into buckets with similar functionalities, defined in the Access section

Role
Creating a new Role

Editing an existing Role

Notes
  • Name free text
  • Description free text
  • Parent optionally select an existing Role as parent to create a hierarchy of Roles

Users

The Users are listed here with the main fields, except the password for obvious reason.

Clicking to view the details, we can see and navigate through the list of login times.

Expanding the User's information through the view link button, we can see the list of activities.

User
Creating a new User

Editing an existing User

Notes
  • First Name free text
  • Last Name free text
  • Full Name free text - sometimes, people like to be called by a different name that does not necessarily match the first and last name
  • Initials free text - these are used in many places, make sure that they are unique
  • User Name free text - used to log in and in the top-right corner to identified the user. This should be unique to avoid confusion
  • Email Address free text in the format of an email address
  • Role select 1 Role from the list that comes from the Roles that were created
  • Is Employee flag - an employee will have access to a Time Card
  • Is Preparer flag - a Preparer will appear in the assignment list where needed
  • Is Reviewer flag - a Reviewer will appear in the assignment list where needed
  • Allow Offsite flag - will allow a User to log in from a different IP than that from the work place

The password is set by the administrator through a specific form.

Creating a new Access

Notes
  • New Password the password is set by an Admin and trsansmitted to the User. The password must be at least 8 characters in length and contain at least 1 capital letter, one lower case letter, one digit, and one special character.
  • Confirm the confirmation must match the password.

Employees

Employees are extensions to Users where we keep the information about address, communication channels, salary, wages, time off, and other HR-related information.

The Create button ensures that all the Users set as Employee have a matching record in the Employee table.

There is no form to create a new Employee.

Only the field related to the Employee, not those set for the corresponding User, are available for editing.

Employee
Editing an existing Employee

Notes
  • Address is typiically the home address
    • Street free text
    • Line 2 free text
    • City free text
    • State pick the State from the list
    • Zip Code free text in the format of a 5+4 zip code
  • Communication is for the ways to communicate with the Employee
    • Phone Number #1 type and number in the proper format
    • Phone Number #2 type and number in the proper format
    • Email Address free text in the proper format of an email address
  • HR is used to set the parameters of an Employee's wages
    • Employee Type select Full Time or Hourly
    • Start Date is the date when the Employee started working, for the purpose of computing total wages
    • Salary is the amount earned per period
    • Frequency is the length of the pay period
    • Overtime Wages is the hourly wage after the base time has been completed
    • Saturday Wages is the hourly wage for work performed on a Saturday
    • Sunday Wages is the hourly wage for work performed on a Sunday
    • Schedule is the description of the basic schedule

Time Card

Time Cards are defined by Pay Periods, and Pay Periods are created for the year thanks to the Build Periods button.

Once an Employee and a Period have been selected, we can see the start and end times for each work period.

Time Card
Time Card panel

Notes
  • Pick an Employee from the list
  • Navigate the Pay Periods with the left and right arrows
  • There is no limit to the number of work periods in a day
  • If the Employee added a comment when submitting a start or end time, the comment icon will appear and the comment will be shown under the grid, specifying the day when it was created
  • Every day with logged time has a button used for the Administrator to edit the day's timing data
  • A simple click on a work period will turn it green, which means that it was approved as entered
  • When hovering over a green Work Period, a comment will show who approved the time
  • The Administrator can create comments, which will apear in a blue tone with the name of the Administrator (Employee's comments do not carry the name because we know which Employee we are dealing with)
  • Administrator comments can be deleted
  • The Add Comment will create the comment, which will be seen here and by the Employee
  • The Approve All will approve all the Work Periods on the page
  • The Reject All will remove the approval on all the Work Periods on the page
Editing a Work Day

Notes
  • Each day may be edited by the Administrator to adjust the number of hours and minutes that should really be taken into account. This should typically happen based on the Employee's comments, which is why comments are displayed next to the each Work Day
  • A Work Period can be deleted

Access

This is where functionalities are paired with Roles to allow or deny visibility, access, or control across the application.

Access
Creating a new Access

Editing an existing Access

Notes
  • Realm is the area of the website, like Communication, Transactions, or Office
  • Page is the name of the page
  • Feature is the functionality that we want to target
  • Description is the description of the behavior sought after

Services

Services are created under a category, which either exists or is created on the fly. New categories will appear in the drop down upon refresh because the source comes from the existing categories across all Services.

Services have a periodicity and a base fee, which can be adapted to the customer to which the Service is attached.

A Service may require certain documents and follow one or several workflows.

Service
Creating a new Service

Editing an existing Service

Notes
  • Category the category of service is selected from the list of existing categories or a new category may be created by selecting the option "Other", which will cause free input to be entered.
  • Name free text for the name of the service
  • Description the description which will appear in several places. It is entered as pure html code
  • Periodicity the frequency of the work to be performed or expected to be performed. The options are:
    • One time only one time - no reminder
    • Yearly every year, at the proper date, based on the Service
    • Quarterly every quarter
    • Monthly every month
    • Daily every day
  • Fee per Period is just the basic fee, provided as a guideline, not the final fee agreed upon with the Customer
  • Documents is the list of Documents that may be involved with the Service
  • Workflows is the list of Workflows that may be involved with the Service

Documents

Documents are created for a specific year or are timeless.

Documents are declared here to be used in Services as input or output requirements.

Documents may be optional, in order to avoid blocking a workflow.

Document
Creating a new Document

Editing an existing Document

Notes
  • Code free text, usually a code that may be used by any institution to define a specific document
  • Name free text for the name of the Document
  • Description free text to describe the Document and the instructions on its use for the purpose of tracking
  • URL the link to information about the Document
  • Year the year for which the Document will be used
  • Inbound whether the Document is to be received from or delivered to the Customer
  • Optional whether the Document is mandatory or not

Workflows

Workflows are a list of virtual tasks that are assigned to a Service as a chain with conditions to move from one task to the next.

Workflow
Creating a new Workflow

Editing an existing Workflow

Notes
  • Name free text - the name of the Workflow
  • Description free text - the description of what the Workflow is about
  • Start Action the action that initiates the Workflow

Pricing

Here, we keep track of pricing for different services. It consists of the reverse list from the fees on Services, and additional fees, not related to those Services as processes.

Pricing
Creating a new Pricing

Editing an existing Pricing

Notes
  • Name the name of the item for which the Pricing is about
  • Price the reference price
  • Description the description of item for which the Pricing is about
  • Features the features involved

Tasks

When an Employee is assigned to a record in Communication, Transaction, or to a Customer, a Task will appear here.

Tasks are unique from the Realm, Collection, and ID from their source. The Employee assigned will change automatically as it is modified at the source.

Employees will be able to modify Tasks by changing the Status, Progress, and Comments.

Task
Editing an existing Task

Notes
  • Status the current status of the Task. The options are:
    • New indicates that the Task has been created but not acknoledged
    • In Progress indicates that the Task owner is aware of the work to be done and is taking action
    • QA indicates that the Task is ready to be verified
    • Approval indicates that the Task has been approved and is pending final implementation
    • Done indicates that the Task is complete
  • Progress the estimate percentage of the work done
  • Comments is the list of aggregated comments over the life of the Task

Services

The Services section is just the list of all Services offered, formated for Employees to see and be familiar with.

This page should be consulted when discussing Services with current or prospective customers

List

The list is expandable and contains information about the details that each Service offers.

Customer

By Customer, we mean any individual or entity that is a customer. Several fundamental data points are very different between individuals and entities, but they both share most of the data structure beyond those.

Create

To create a customer, we are provided the option to create either an individual or an entity, or both at once.

The named person will be the main taxpayer or the main officer to one or several enitiies.

The customer could be just a prospect or a registered customer.

The urgency of the work to be performed will be assigned to all resulting customer records.

There is no limit to the number of companies that can be created with one individual. All will be linked through the entity-officer link or through the individual-entity link.

Services may also be attached upon creating the customers.

Customer

  • First Name free text field
  • Last Name free text field
  • Phone Number free text field formated as a Phone Number
  • Email Address free text field formated as an Email Address
  • Client Type pick 1 or both, according to the needs
    • Individual will create an Individual Customer
    • Entity will create an Entity Customer
  • Prospect? is a flag that will mark the records as "prospect" and keep them out of the lists of regular customers
  • Urgency will associate a level of urgency that will appear in the lists of Customers
  • Companies allows you to create as many companies as needed. Each Company will be created as an Entity, using the name set here
  • Services use this expandable list to preload services. Services will be attached to the Customers and can be adjusted in the Customer's pages

Individual

An Individual is a person who is a Customer to represent him/herself and spouse, and dependents for the purpose of tax return and related filings.

List

The list of customers of type Individual can be filtered by name, urgency, status, preparer in charge, and by being a prospect or a customer.

Clicking on the edit link will open the customer as a tab. Several customers may be opened at once. Clicking twice on the same customer will activate the tab.

Opened customers will be remembered even after moving away from the page or logging out and back in at a later time. This behavior is based on the browser, not the user. So, logging in from a different computer or browser will not maintain the same list.

THe view link will provide quick information about the customer in order to avoid opening it in a tab.

Customers may be bdeleted here as well.

Customer

The layout for customers consists of 3 areas:

  • The identification area where we see the very top-level information about the customer, its name and its level of urgency.
  • The communication panel where we have the list of events, progress, and tasks.
  • The main panel where we interact with each segment of the customer's data.

Header

The identification area is used to set the level of urgency by cicking on the desired level, which immediately updates the list and the tab.

Communication

The communication panel has 3 tabs:

  • History which gives us a list of events in reverse chronological order: most recent on top. This list consists of:
    • Calls made to or received from the customer.
    • Email sent to the customer. Most of these will be generated email to inform the customer of missing information or progress made.
    • Appointment created in this application that feed the general agenda for the company and the Google calendar for each Employee.
    • Task assigned to an Employee.
  • Progress which is combined with the Services and shows the steps made toward completion.
  • Notes which can be taken anytime to complement the customer's file.

Each event is presented in a summary view to use only 1 line and is expandable to show the details.

Communication

The records in each category are displayed with a quick summary which should provide enough information to inform the user of its nature and rough content.

Expanding a record causes all its data to display. The data is pulled at the time of expansion, so if the record was modified elsewhere, even after loading the Customer, the data in the card view will be updated and will be updated again upon collapsing and re-expanding.

The expanded data also provides a pencil icon to call the edit form and make the necessary modifications.

Communication records can be initiated here for the active customer, or they can be created in the dedicated pages where a customer will have to be selected.

All the fields may be modified. The customer is automatically set from the active customer.

The list of Preparers is maintained from the Administration > Users page

Each record comes with a Status that can be selected from the following options:

  • New the record has been created by someone other than the Preparer, or it is left for later.
  • In Progress the record has been seen by the Preparer and is being evaluated.
  • Handled the work has been done but we still need to inform the client or get confirmation.
  • Closed the issue has been resolved.

Upon saving, the record becomes available to be caught in the Tasks and assigned to the Preparer. It will be gone from the list of Tasks when assigned to another Preparer or when the Status is set to Closed

Call
Creating a new Call

Editing an existing Call

Notes
  • Preparer pick a Preparer from the list
  • Caller free text field
  • Phone Number free field for a phone number
  • Subject free text field - it is used in other places to reference the Call, it should be short and meaningful
  • Issue describe the issue with all the details
  • Call Details add information about the Call that could be useful for the follow up
  • Response Details indicate what was told to the customer
  • Status pick the most relevant option
Email
Creating a new e-Mail

Editing an existing e-Mail

Notes
  • Preparer pick a Preparer from the list
  • Recipient free text field
  • Subject free text field - it is used in other places to reference the Call, it should be short and meaningful
  • Content the body of the email
  • Follow Up indicate what to do next
  • Status pick the most relevant option
Appointment
Creating a new Appointment

Editing an existing Appointment

Notes
  • Preparer pick a Preparer from the list
  • Start Time pick the date and time as hour and minutes, between 7am and 7pm
  • Duration pick from the list of durations by 15 minutes increment
  • Subject free text field - it is used in other places to reference the Call, it should be short and meaningful
  • Description the description of what the appointment is about
  • Resolved indicates if the issues discussed during the meeting where addressed
  • Follow Up indicate what to do next
  • Status pick the most relevant option
Task
Creating a new Task

Editing an existing Task

Notes
  • Preparer pick a Preparer from the list
  • Subject free text field - it is used in other places to reference the Call, it should be short and meaningful
  • Description
  • Completed On the date when the Task was completed
  • Status pick the most relevant option

Summary

In the main panel, we find the summary tab that regroups all the information about the customer in a compact display.

Transactions

Transactions, which are created in their dedicated pages, are shown here for the customer in expandable sections.

Notes can be seen by clicking in the corresponding icon, while the other potentially long fields will be seen in the corresponding "Edit" forms."'

The Transactions share several fields.

The Urgency will be carried over to the Task that is matched and is one of the following values:

  • Regular
  • Important
  • Urgent

Tasks will be prioritized according to their urgency.

The Status will be one of the following:

  • Received the default status indicates that the Transaction was acknowledged
  • In Progress the work related to the Transaction is being done
  • Handled the work related to the Transaction has been fulfilled
Document Drop Off
Editing an existing Document Drop Off

Notes
  • Urgency the level of urgency
  • Month the reference month of the document
  • Year the reference year of the document
  • Preparer the Preparer assigned
  • Scanned indicates that the Document(s) related to the Transaction has been scanned
  • Status the Status in which the Transaction is
IRS Notice
Editing an existing IRS Notice

Notes
  • Urgency the level of urgency
  • Date of Notice the date on the notice from the authority that sent it
  • Description is an explanation of the content of the Notice
  • Tax Year the tax year for which the notice is destined
  • Preparer the Preparer assigned
  • Response Details is a description of the response provided
  • Status the Status in which the Transaction is
Tax Return Tracking
Editing an existing Tax Return Tracking

Notes
  • Return Type is the type of return that we are tracking
  • Contact Name is the name of the point person, if different from the Customer
  • Contact Number is the phone number of the such contact
  • Return Status is the Status of the Return
  • Urgency the level of urgency
  • Preparer the Preparer assigned
  • Status the Status in which the Transaction is
Project Tracking
Editing an existing Project Tracking

Notes
  • Return Type is the type of return that we are tracking
  • Contact Name is the name of the point person, if different from the Customer
  • Contact Number is the phone number of the such contact
  • Return Status is the Status of the Return
  • Urgency the level of urgency
  • Preparer the Preparer assigned
  • Status the Status in which the Transaction is
Tax Return Extension Request
Editing an existing Tax Return Extension Request

Notes
  • Contact Name is the name of the point person, if different from the Customer
  • Contact Number is the phone number of the such contact
  • Urgency the level of urgency
  • Extension Filed Date is the date when the Extension was filed
  • Preparer the Preparer assigned
  • Status the Status in which the Transaction is

Details

Dependent
Creating a new Dependent

Editing an existing Dependent

Notes
  • First Name free text
  • Last Name free text
  • SSN format field for a Social Security Number
  • Date of Birth the date of birth of the Dependent
  • Date of Death the date of death, which will provide an impact in further workflows
  • Relationship the legal relationship between the Dependent and the Taxpayer
  • Months at Home the number of months that the Dependent spent at the Taxpayer's home, defaulting to 12
Address
Creating a new Address

Editing an existing Address

Notes
  • Active indicates that the Address is active
  • Validated indicates that the address has been validated
  • Main indicates that the address is the main one for the Taxpayer - this should well and correctly maintained
  • Owner the owner of the Address - taxpayer, spouse, or both
  • Street the main street address
  • Line2 if needed, additional address information
  • City the city of residence
  • State pick from the list of States
  • Zip Code enter the zip code in the 5+4 format
  • Start the date when the location became a place of residence
  • End the date when the location ceased to be a place of residence
Phone Number
Creating a new Phone Number

Editing an existing Phone Number

Notes
  • Active indicates that the Phone Number is active
  • Validated indicates that the address has been validated
  • Main indicates that the Phone Number is the main one for the Taxpayer - this should well and correctly maintained
  • Owner the owner of the Phone Number - taxpayer, spouse, or both
  • Type select an option
  • Number the phone number in the format area code + number
  • Extension the optional extension as free text
Email Address
Creating a new Email Address

Editing an existing Email Address

Notes
  • Active indicates that the Email Address is active
  • Validated indicates that the address has been validated
  • Main indicates that the Email Address is the main one for the Taxpayer - this should well and correctly maintained
  • Owner the owner of the Email Address - taxpayer, spouse, or both
  • Type select an option
  • Address the email address
Entity Association
Creating a new Entity Association with a Customer

Editing an existing Entity Association with a Customer

Notes
  • Customer is a flag to switch between picking the reference to a Customer or entering the full set of data needed for a non-Customer
  • Entity use the textbox to search among the Entities
  • Ownership the percentage of ownership
Creating a new Entity Association with a non-Customer

Editing an existing Entity Association with a non-Customer

Notes
  • Name the name of the Entity
  • DBA the Entity's DBA
  • EIN the Entity's EIN
  • Date of Incorporation the date when the Entity was created
  • Street the street address of the Entity
  • Line2 additional address information
  • City the city
  • State select from the list
  • Zip Code the Zip Code in format 5+4
  • Country select from the list
  • Phone Number the main phone number
  • Email Address the main email address
  • Ownership the percentage of ownership

Identifications

Identification
Creating a new Identification

Editing an existing Identification

Notes
  • Owner the owner of the Identification - taxpayer, spouse, or both
  • Document Type the type of identifying document
  • Document's Number the document number
  • Place of Issue the place of issue, typically State or Country
  • Date of Issue the date when the document was issued
  • Date of Expiration the date of expiration

Accounts

Bank or Institution

The Bank or Institution is the holder of the login information under which one or many accounts may appear.

Creating a new Institution

Editing an existing Institution

Notes
  • Name of Bank or Institution is the name of the institution that holds the login information
  • Website is the institution's website where Accounts information can be found
  • Phone Number is the phone number of any contact who might be involved in obtaining Accounting information for the Customer
  • Login Information is the information about accessing the Accounting data
  • Notes is a place for additional notes on the Institution to be held
Account
Creating a new Account

Editing an existing Account

Notes
  • Owner the owner of the Account - taxpayer, spouse, or both
  • Type is the type of Account. Options are:
    • Checkingused of checking accounts
    • Saving used for saving accounts
    • Business used for business accounts
    • Credit Card use for credit cards
    • Payroll used to gather data from companies like ADP
    • Other for uncategorized accounts
  • Name free text to describe the Account
  • Routing Number is used for Bank Accounts
  • Account Number is used for Bank Account, for Credit Cards, or any other Account that has a number
  • Statement Day the day when the Statement is typically provided
  • Used for is where we can keep information about the prupose of an Accountm, if any
  • Use for Taxes flag to indicate that the Account will be taken into account for tax pruposes
  • Use for Accounting flag to indicate that the Account will be taken into account for accounting pruposes
  • Notes is used to keep information about the Account

Estimates

Estimate
Creating a new Estimate

Editing an existing Estimate

Notes
  • Owner the owner of the Estimate - taxpayer, spouse, or both
  • Federal is the estimated amount owed to Federal taxes
  • Resident State is the State of residence
  • Resident City is the City of residence
  • Date Paid is the date when a payment was made
  • Amount is the amount that was paid
  • Over Payment Applied is the estimated over payment made
  • First Quarter is the estimated amount for the first quarter
  • Second Quarter is the estimated amount for the second quarter
  • Third Quarter is the estimated amount for the third quarter
  • Fourth Quarter is the estimated amount for the fourth quarter
  • Additional Payments is the amount of additional payments

Documents

Document
Creating a new Document

Editing an existing Document

Notes
  • Owner the owner of the Document - taxpayer, spouse, or both
  • Document is the file to be uploaded
  • Name is the name of the file as it should appear in the system

Services

Service
Creating a new Service

Editing an existing Service

Notes
  • Category is the Category, as set in the Administration section
  • Service is the name of the Service
  • Year is the year for which it applies
  • Status is the Status of the Service, in terms of setting it up
  • Start Date is the date when the Service starts
  • End Date is the date when the Service ends, allowing to keep the data alive, while preventing it from appearing

Entity

An Entity is a company who is a Customer to represent itself for the purpose of tax return and related filings, as well as accounting work.

List

The list of customers of type Entity can be filtered by name, urgency, status, preparer in charge, and by being a prospect or a customer.

Clicking on the edit link will open the customer as a tab. Several customers may be opened at once. Clicking twice on the same customer will activate the tab.

Opened customers will be remembered even after moving away from the page or logging out and back in at a later time. This behavior is based on the browser, not the user. So, logging in from a different computer or browser will not maintain the same list.

The view link will provide quick information about the customer in order to avoid opening it in a tab.

Customers may be bdeleted here as well.

Customer

The layout for customers consists of 3 areas:

  • The identification area where we see the very top-level information about the customer, its name and its level of urgency.
  • The communication panel where we have the list of events, progress, and tasks.
  • The main panel where we interact with each segment of the customer's data.

Header

The identification area is used to set the level of urgency by cicking on the desired level, which immediately updates the list and the tab.

Communication

The communication panel has 3 tabs:

  • History which gives us a list of events in reverse chronological order: most recent on top. This list consists of:
    • Calls made to or received from the customer.
    • Email sent to the customer. Most of these will be generated email to inform the customer of missing information or progress made.
    • Appointment created in this application that feed the general agenda for the company and the Google calendar for each Employee.
    • Task assigned to an Employee.
  • Progress which is combined with the Services and shows the steps made toward completion.
  • Notes which can be taken anytime to complement the customer's file.

Each event is presented in a summary view to use only 1 line and is expandable to show the details.

Communication

The records in each category are displayed with a quick summary which should provide enough information to inform the user of its nature and rough content.

Expanding a record causes all its data to display. The data is pulled at the time of expansion, so if the record was modified elsewhere, even after loading the Customer, the data in the card view will be updated and will be updated again upon collapsing and re-expanding.

The expanded data also provides a pencil icon to call the edit form and make the necessary modifications.

Communication records can be initiated here for the active customer, or they can be created in the dedicated pages where a customer will have to be selected.

All the fields may be modified. The customer is automatically set from the active customer.

The list of Preparers is maintained from the Administration > Users page

Each record comes with a Status that can be selected from the following options:

  • New the record has been created by someone other than the Preparer, or it is left for later.
  • In Progress the record has been seen by the Preparer and is being evaluated.
  • Handled the work has been done but we still need to inform the client or get confirmation.
  • Closed the issue has been resolved.

Upon saving, the record becomes available to be caught in the Tasks and assigned to the Preparer. It will be gone from the list of Tasks when assigned to another Preparer or when the Status is set to Closed.

Call
Creating a new call

Editing an existing call

Notes
  • Preparer pick a Preparer from the list
  • Caller free text field
  • Phone Number free field for a phone number
  • Subject free text field - it is used in other places to reference the Call, it should be short and meaningful
  • Issue describe the issue with all the details
  • Call Details add information about the Call that could be useful for the follow up
  • Response Details indicate what was told to the customer
  • Status pick the most relevant option
Email
Creating a new email

Editing an existing email

Notes
  • Preparer pick a Preparer from the list
  • Recipient free text field
  • Subject free text field - it is used in other places to reference the Call, it should be short and meaningful
  • Content the body of the email
  • Follow Up indicate what to do next
  • Status pick the most relevant option
Appointment
Creating a new appointment

Editing an existing appointment

Notes
  • Preparer pick a Preparer from the list
  • Start Time pick the date and time as hour and minutes, between 7am and 7pm
  • Duration pick from the list of durations by 15 minutes increment
  • Subject free text field - it is used in other places to reference the Call, it should be short and meaningful
  • Description the description of what the appointment is about
  • Resolved indicates if the issues discussed during the meeting where addressed
  • Follow Up indicate what to do next
  • Status pick the most relevant option
Task
Creating a new task

Editing an existing task

Notes
  • Preparer pick a Preparer from the list
  • Subject free text field - it is used in other places to reference the Call, it should be short and meaningful
  • Description
  • Completed On the date when the Task was completed
  • Status pick the most relevant option

Summary

In the main panel, we find the summary tab that regroups all the information about the customer in a compact display.

Transactions

Transactions, which are created in their dedicated pages, are shown here for the customer in expandable sections.

Notes can be seen by clicking in the corresponding icon, while the other potentially long fields will be seen in the corresponding "Edit" forms."'

The Transactions share several fields.

The Urgency will be carried over to the Task that is matched and is one of the following values:

  • Regular
  • Important
  • Urgent

Tasks will be prioritized according to their urgency.

The Status will be one of the following:

  • Received the default status indicates that the Transaction was acknowledged
  • In Progress the work related to the Transaction is being done
  • Handled the work related to the Transaction has been fulfilled
Document Drop Off
Editing an existing Document Drop Off

Notes
  • Urgency the level of urgency
  • Month the reference month of the document
  • Year the reference year of the document
  • Preparer the Preparer assigned
  • Scanned indicates that the Document(s) related to the Transaction has been scanned
  • Status the Status in which the Transaction is
IRS Notice
Editing an existing IRS Notice

Notes
  • Urgency the level of urgency
  • Date of Notice the date on the notice from the authority that sent it
  • Description is an explanation of the content of the Notice
  • Tax Year the tax year for which the notice is destined
  • Preparer the Preparer assigned
  • Response Details is a description of the response provided
  • Status the Status in which the Transaction is
Tax Return Tracking
Editing an existing Tax Return Tracking

Notes
  • Return Type is the type of return that we are tracking
  • Return Status is the Status of the Return
  • Urgency the level of urgency
  • Preparer the Preparer assigned
  • Status the Status in which the Transaction is
Project Tracking
Editing an existing Project Tracking

Notes
  • Return Type is the type of return that we are tracking
  • Contact Name is the name of the point person, if different from the Customer
  • Contact Number is the phone number of the such contact
  • Return Status is the Status of the Return
  • Urgency the level of urgency
  • Preparer the Preparer assigned
  • Status the Status in which the Transaction is
Tax Return Extension Request
Editing an existing Tax Return Extension Request

Notes
  • Urgency the level of urgency
  • Extension Filed Date is the date when the Extension was filed
  • Preparer the Preparer assigned
  • Status the Status in which the Transaction is

Details

Address
Creating a new Address

Editing an existing Address

Notes
  • Active indicates that the Address is active
  • Validated indicates that the address has been validated
  • Main indicates that the Address is the main one for the Taxpayer - this should well and correctly maintained
  • Owner the owner of the Address - taxpayer, spouse, or both
  • Street the main street address
  • Line2 if needed, additional address information
  • City the city of residence
  • State pick from the list of States
  • Zip Code enter the zip code in the 5+4 format
  • Start the date when the location became a place of residence
  • End the date when the location ceased to be a place of residence
Phone Number
Creating a new Phone Number

Editing an existing Phone Number

Notes
  • Active indicates that the Phone Number is active
  • Validated indicates that the address has been validated
  • Main indicates that the Phone Number is the main one for the Taxpayer - this should well and correctly maintained
  • Owner the owner of the Phone Number - taxpayer, spouse, or both
  • Type select an option
  • Number the phone number in the format area code + number
  • Extension the optional extension as free text
Email Address
Creating a new Email Address

Editing an existing Email Address

Notes
  • Active indicates that the Email Address is active
  • Validated indicates that the address has been validated
  • Main indicates that the Email Address is the main one for the Taxpayer - this should well and correctly maintained
  • Owner the owner of the Email Address - taxpayer, spouse, or both
  • Type select an option
  • Address the email address
Officer
Creating a new Officer with a Customer

Editing an existing Officer with a Customer

Notes
  • Customer is a flag to switch between picking the reference to a Customer or entering the full set of data needed for a non-Customer
  • Officer is used to search through the list of Individuals to set an Officer of the Entity
  • Ownership is for the percentage of ownership held by the officer

Only the ownership may be changed. If the Individual selected is erroneous, it should be deleted.

Creating a new Officer with a non-Customer

Editing an existing Officer with a non-Customer

Notes
  • First Name free text
  • Last Name free text
  • SSN a valid SSN
  • Date of Birth a valid date of birth
  • Street free text
  • Line2 free text
  • City free text
  • State select from the list of States
  • Zip Code is for a valid 5+4 Zip Code
  • Country select from the list of Countries
  • Phone Number is for a phone number in a valid format
  • Email Address is for a valid email address
  • Ownership is for the percentage of ownership held by the Officer
Entity Association
Creating a new Entity Association with a Customer

Editing an existing Entity Association with a Customer

Notes
  • Customer is a flag to switch between picking the reference to a Customer or entering the full set of data needed for a non-Customer
  • Officer is used to search through the list of Entities to set as associated with the Entity
  • Ownership is for the percentage of ownership held by the Entity
Creating a new Entity Association with a non-Customer

Editing an existing Entity Association with a non-Customer

Notes
  • Name the name of the Entity
  • DBA the Entity's DBA
  • EIN the Entity's EIN
  • Date of Incorporation the date when the Entity was created
  • Street the street address of the Entity
  • Line2 additional address information
  • City the city
  • State select from the list
  • Zip Code the Zip Code in format 5+4
  • Country select from the list
  • Phone Number the main phone number
  • Email Address the main email address
  • Ownership the percentage of ownership

Identifications

Identification
Creating a new Identification

Editing an existing Identification

Notes
  • Owner the owner of the Identification - taxpayer, spouse, or both
  • Document Type the type of identifying document
  • Document's Number the document number
  • Place of Issue the place of issue, typically State or Country
  • Date of Issue the date when the document was issued
  • Date of Expiration the date of expiration

Accounts

Bank or Institution

The Bank or Institution is the holder of the login information under which one or many accounts may appear.

Creating a new Institution

Editing an existing Institution

Notes
  • Name of Bank or Institution is the name of the institution that holds the login information
  • Website is the institution's website where Accounts information can be found
  • Phone Number is the phone number of any contact who might be involved in obtaining Accounting information for the Customer
  • Login Information is the information about accessing the Accounting data
  • Notes is a place for additional notes on the Institution to be held
Account
Creating a new Account

Editing an existing Account

Notes
  • Owner the owner of the Account - taxpayer, spouse, or both
  • Type is the type of Account. Options are:
    • Checkingused of checking accounts
    • Saving used for saving accounts
    • Business used for business accounts
    • Credit Card use for credit cards
    • Payroll used to gather data from companies like ADP
    • Other for uncategorized accounts
  • Name free text to describe the Account
  • Routing Number is used for Bank Accounts
  • Account Number is used for Bank Account, for Credit Cards, or any other Account that has a number
  • Statement Day the day when the Statement is typically provided
  • Used for is where we can keep information about the prupose of an Accountm, if any
  • Use for Taxes flag to indicate that the Account will be taken into account for tax pruposes
  • Use for Accounting flag to indicate that the Account will be taken into account for accounting pruposes
  • Notes is used to keep information about the Account

Estimates

Estimate
Creating a new Estimate

Editing an existing Estimate

Notes
  • Owner the owner of the Estimate - taxpayer, spouse, or both
  • Federal is the estimated amount owed to Federal taxes
  • Resident State is the State of residence
  • Resident City is the City of residence
  • Date Paid is the date when a payment was made
  • Amount is the amount that was paid
  • Over Payment Applied is the estimated over payment made
  • First Quarter is the estimated amount for the first quarter
  • Second Quarter is the estimated amount for the second quarter
  • Third Quarter is the estimated amount for the third quarter
  • Fourth Quarter is the estimated amount for the fourth quarter
  • Additional Payments is the amount of additional payments

Documents

Document
Creating a new Document

Editing an existing Document

Notes
  • Owner the owner of the Document - taxpayer, spouse, or both
  • Document is the file to be uploaded
  • Name is the name of the file as it should appear in the system

Services

Service
Creating a new Service

Editing an existing Service

Notes
  • Category is the Category, as set in the Administration section
  • Service is the name of the Service
  • Year is the year for which it applies
  • Status is the Status of the Service, in terms of setting it up
  • Start Date is the date when the Service starts
  • End Date is the date when the Service ends, allowing to keep the data alive, while preventing it from appearing

Accounting

The Accounting page works like a dynamic checklist, going over the steps of the Accounting process.

The first part of the process, for a particular period, consists in grabbing all qualified accounts from the list of Accounts. Those are the Accounts in Banks or Institutions that are marked to be used in Accounting. To pull the Accounts, click on the Refresh Period. This will only work in the Gathering completed flag is set to Completed.

Following this steps, once the gathering of accounts information is considered complete, the following areas summarize the progress, which is set through dedicated popup forms, described below.

Accounting
Form for an Accounting Service

Notes
  • Service is used to set the frequency of the Service. Options are:
    • Monthly
    • Quarterly
    • Yearly
  • Start Dateis the date when the Accounting Service starts
  • End Date is the date when the Accounting Service stops. This is here because we want to keep the existing information, not delete it if the Service ends
  • Reports Instructions is provided to keep instructions or comments on the process overall
  • Status allows us to keep track of the overall Status. Options are:
    • Pending means that information from the Customer is required to setup the Service
    • In Progress means that the process is being handled
    • On Hold means that the process requires attention to proceed
    • Up-to-date means that all operations are complete for the current period
    • Closed is combined to the End Date to stop the work
Form for an Accounting Period

Notes
  • Type is used to set the frequency. Options are:
    • Monthly allows to select the index of the period from a monthly division
    • Quarterly allows to select the index of the period from a quaterly
    • Yearly forces the index to be 1
    • Occasionally allows the gathering of Accounting data outside of the periodical frame
  • Index is the index of the period in the year
  • Status is the Status of the work for the selected period. Options are:
    • Pending means that the work is scheduled but not started
    • In progress means that the work is going on
    • On hold means that something requires special attention
    • In review means that the work is done and is ready for someone to review
    • Complete means that the work is done
  • Reviewer the Employee who is charged with handling the work
  • Note is for notes specific to the period
Accounts

Now that we have all the accounts invilved in the Account work for the Period listed, we mark each one as received or skipped.

When all Accounts have been handled, the Gathering flag is set to complete and the process may continue to each further step.

Next Steps

Each of the next 3 steps is backed by the same parameters:

  • Status is the Status of the work for the selected period. Options are:
    • Pending means that the work is scheduled but not started
    • In progress means that the work is going on
    • On hold means that something requires special attention
    • In review means that the work is done and is ready for someone to review
    • Complete means that the work is done
  • Note is used to keep track of the progress of the Step
  • Completion Date indicates when the Step is officially complete
Form for the Accounting Encoding

Form for the Financial Statements

Form for the Financial Report

The Accounting process under way

Notes

Accounts that are marked as received are set.

Accounts that are marked as skipped can still be received.

Once the gathering project is complete, the Accounts may not be changed anymore.

The following Steps are processed in sequence and one should be complete before setting the parameters on the next.

List

This section is reserved for summary report giving direct access to the Entities that requested their Accounting to be managed.

The area is still under construction.

Customer

The Accounting process is explained above

The whole process is described in the video

Transactions

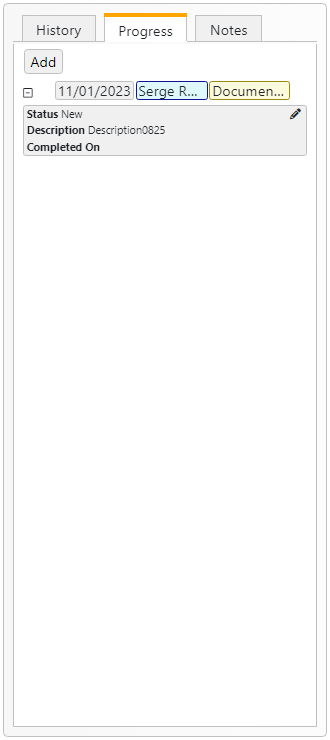
Transactions are created as work comes in. Typically, it will be triggered by a document that is received and continue with the type of document, which can then lead to the creation of a record in another Transaction table.

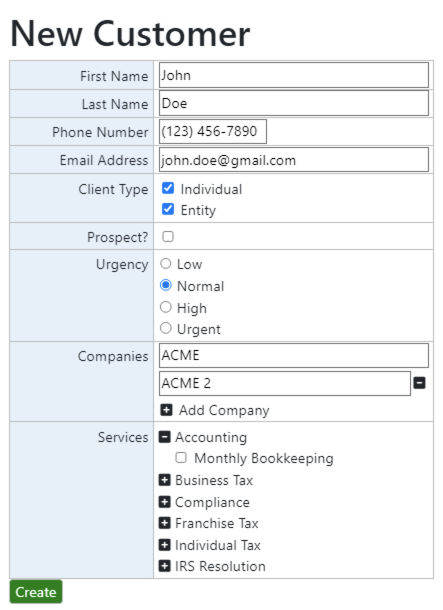
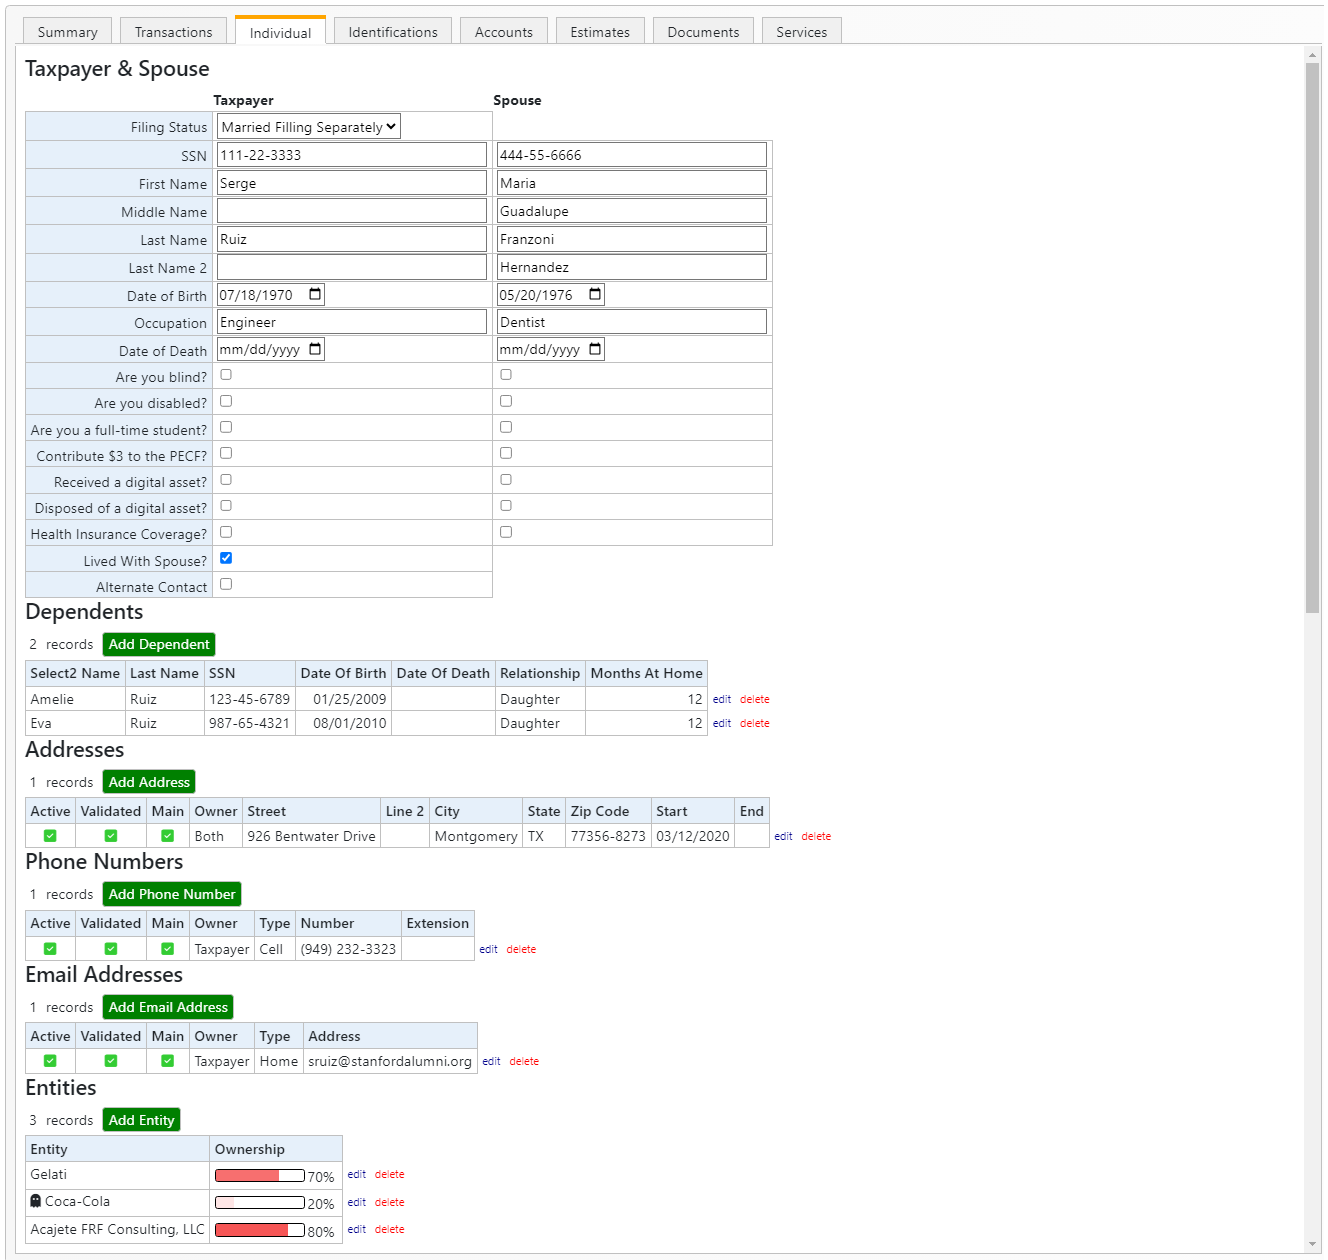
Transactions are attached to a customer but are stored in the transaction tables and bound to the customer on request. This allows for a better management of the transactions across employees.

Once a transaction has been assigned to a customer, it cannot be changed. In case of an error, the transaction record(s) will have to be deleted and a new one created.

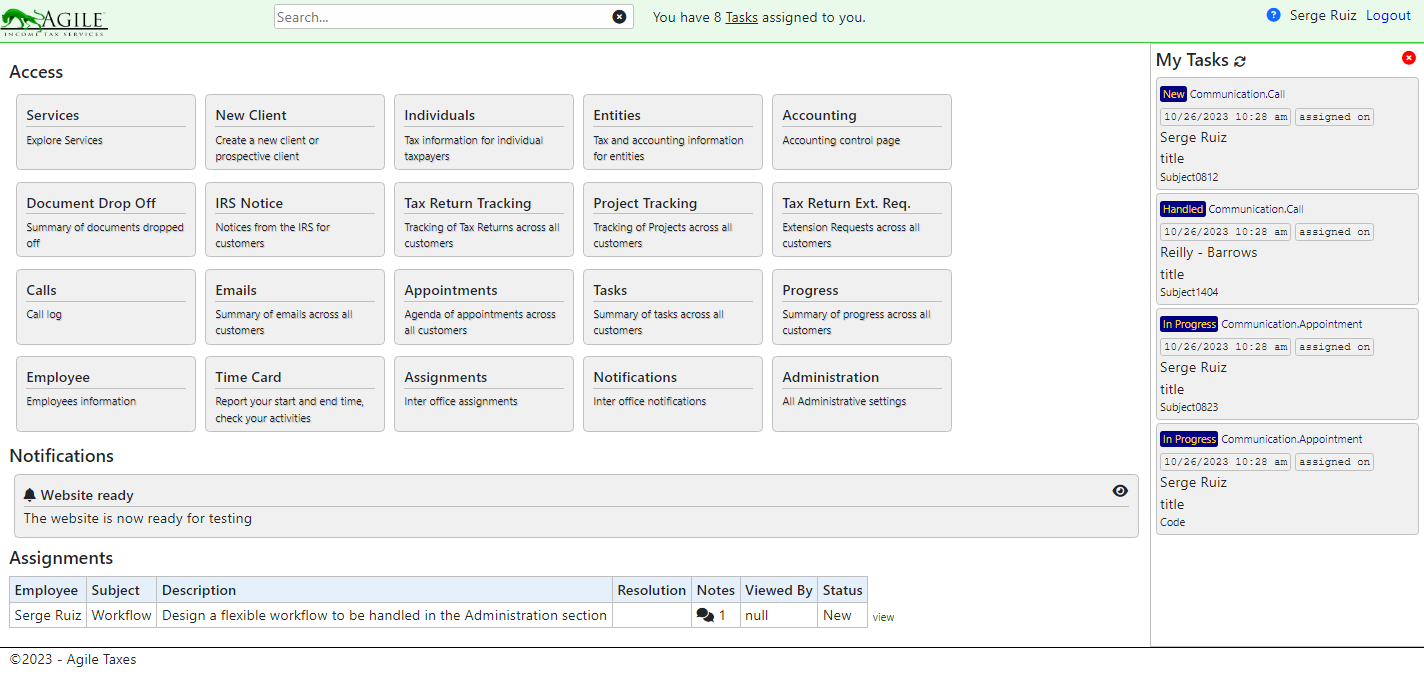
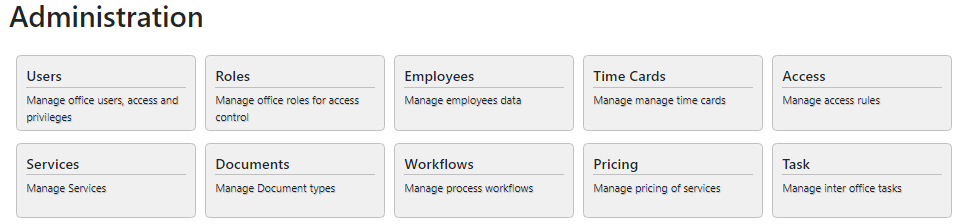
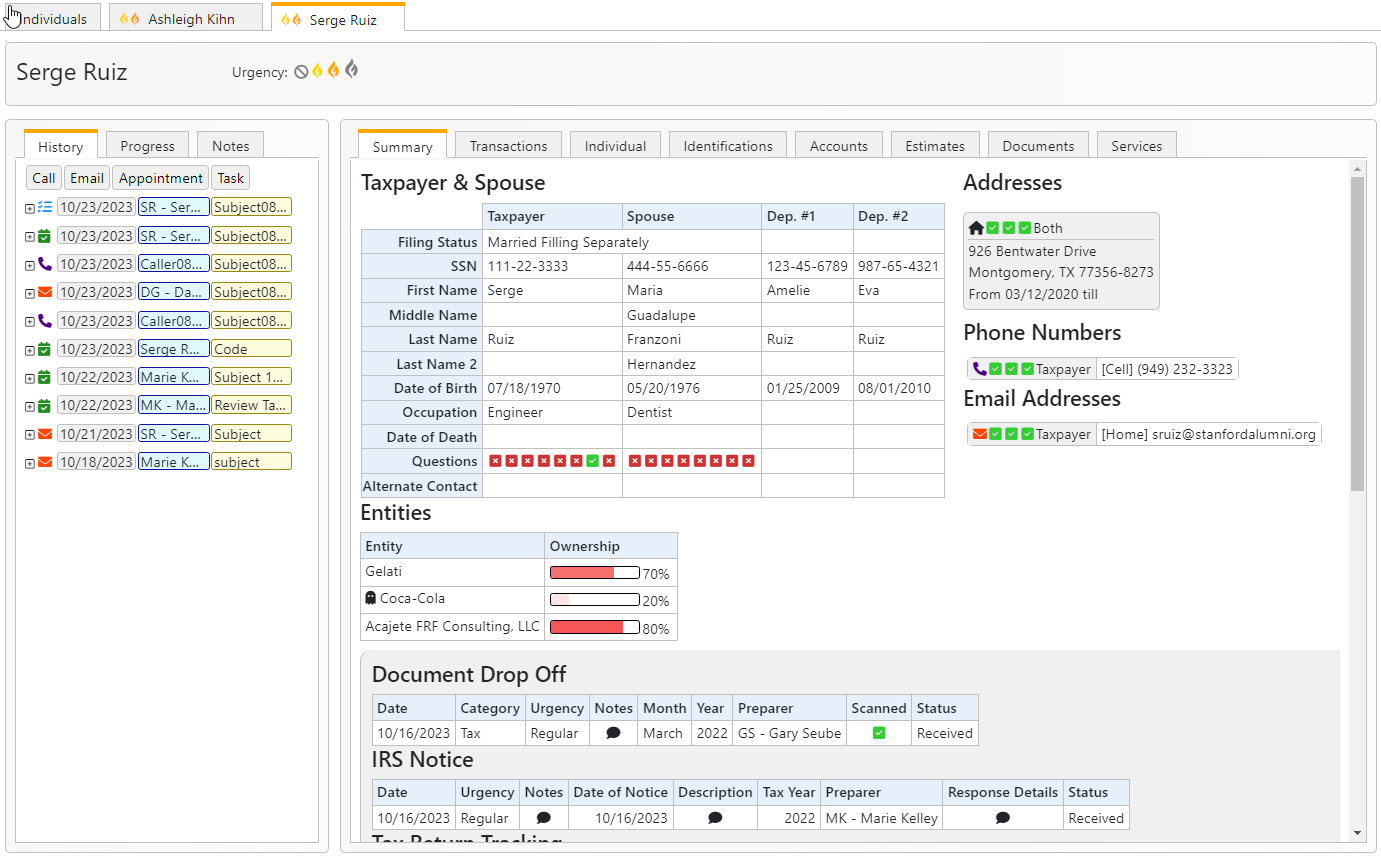
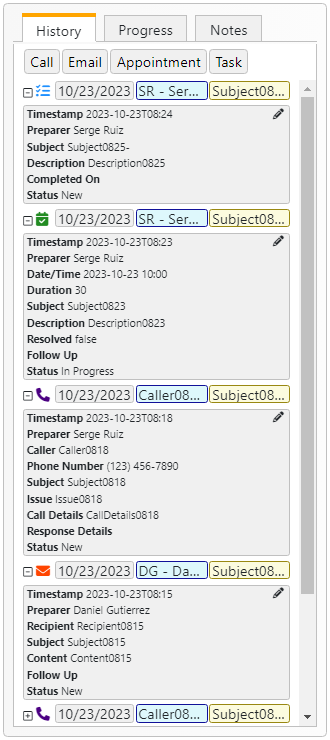
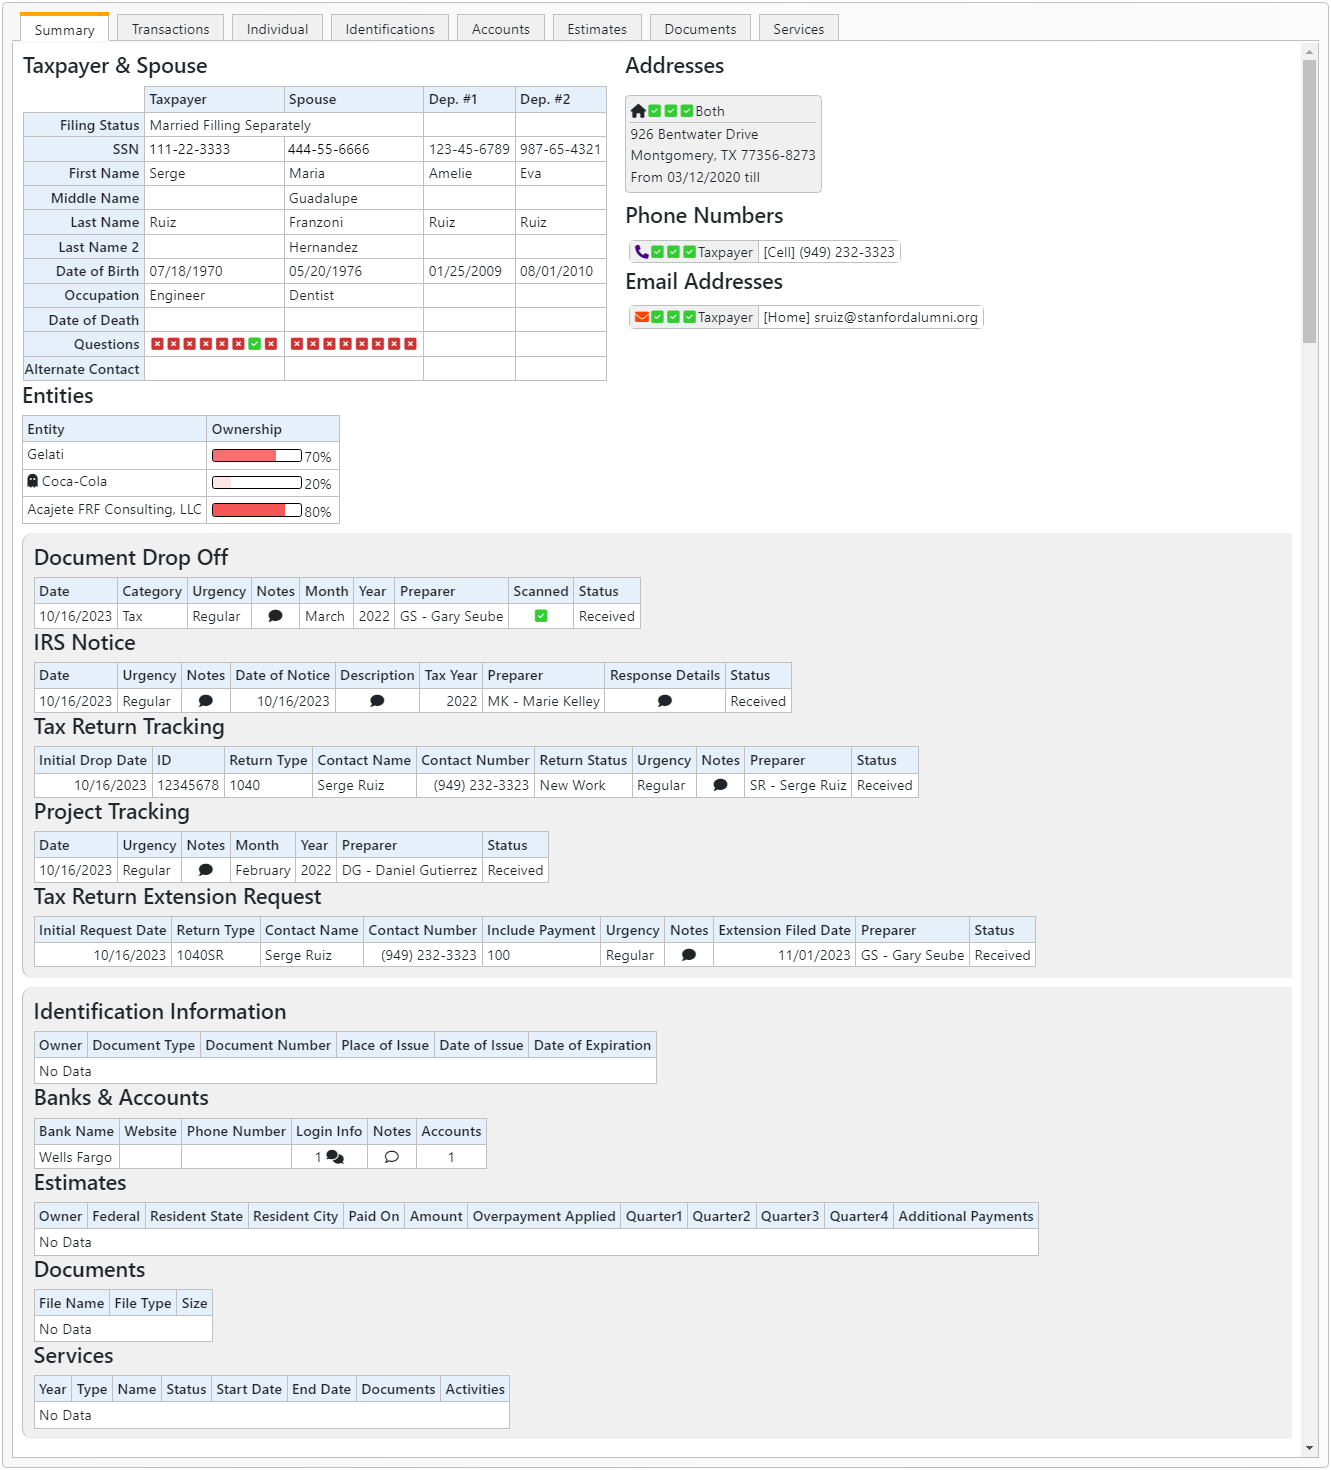
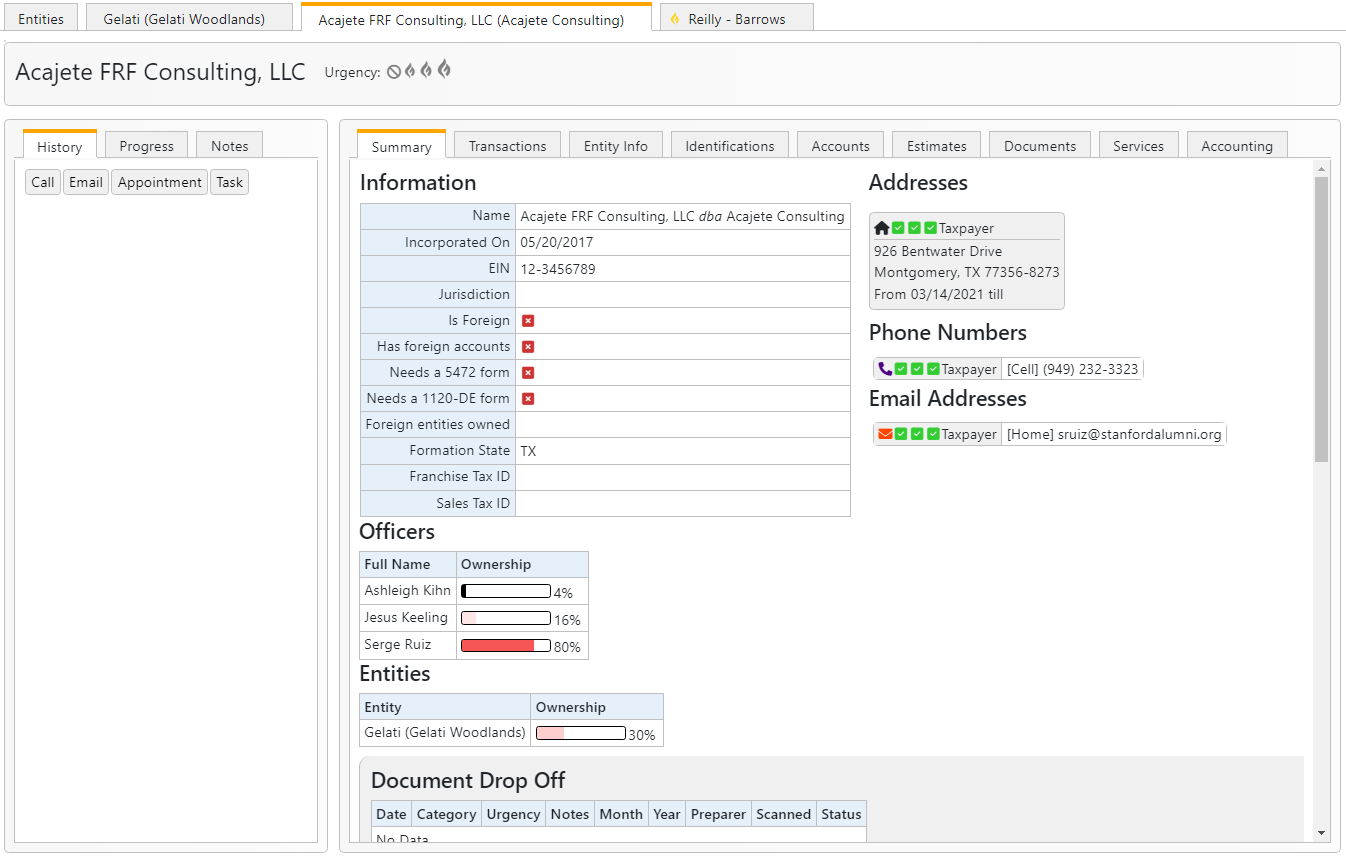
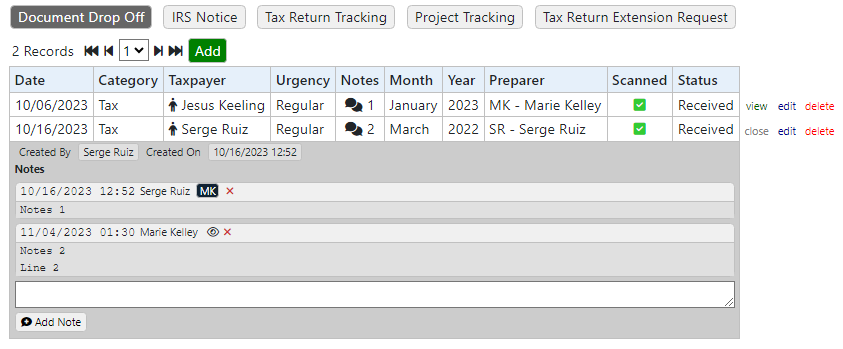
There are 5 types of transactions, they are directly accessible through the menu bar, on top. They are:

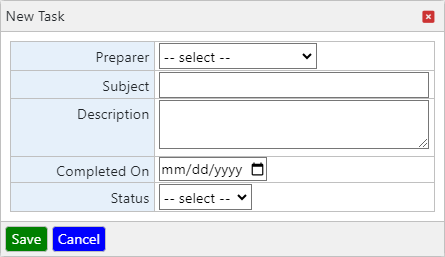
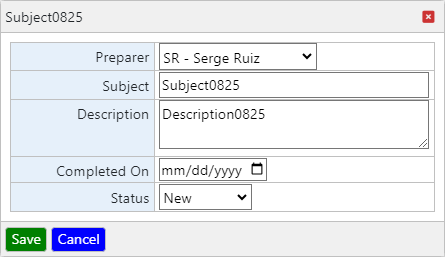
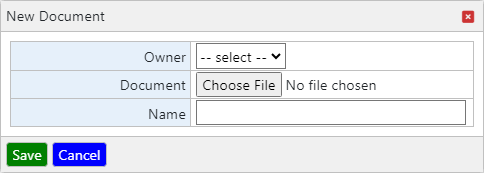
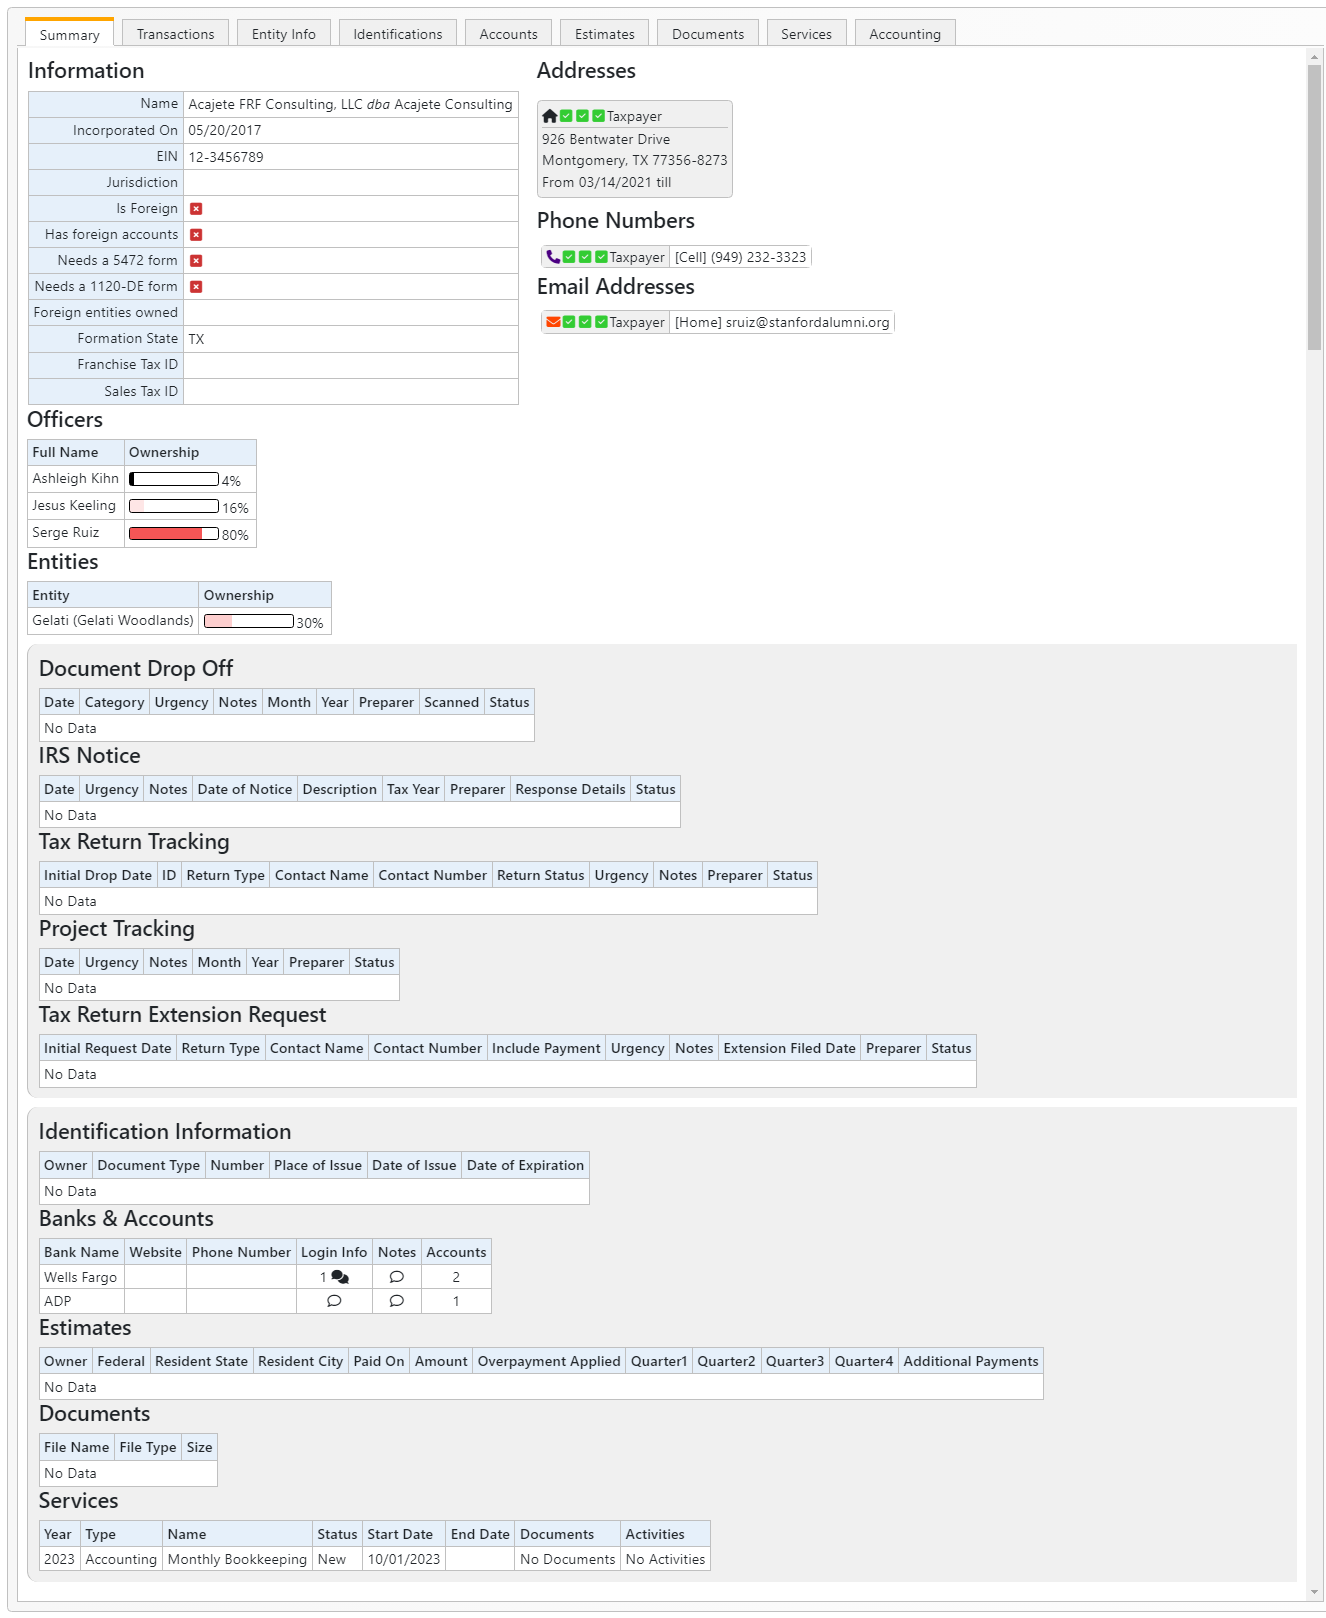
  • Document Drop Off to record when a document is received.
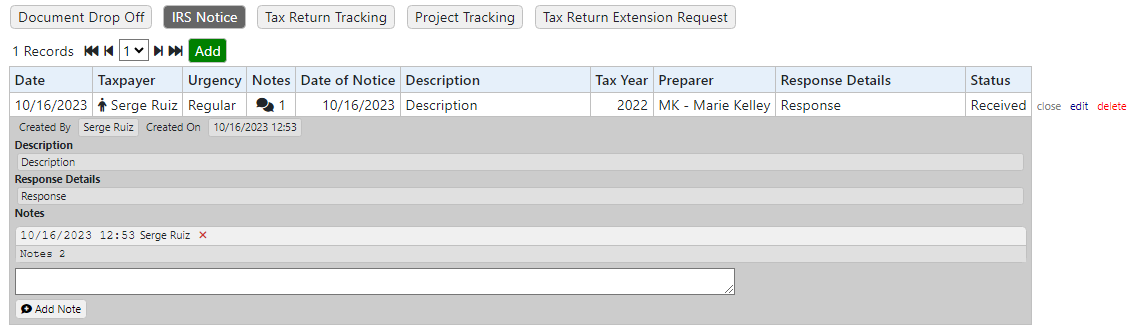
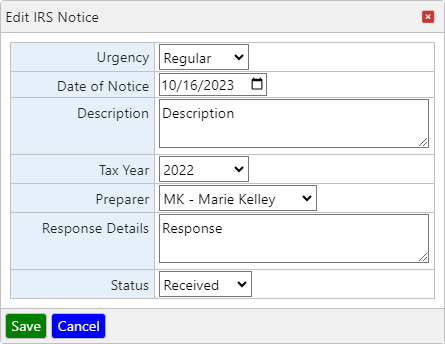
  • IRS Notice when mail from the IRS is received.
  • Tax Return Tracking when a document is related to the a federal Tax Return.
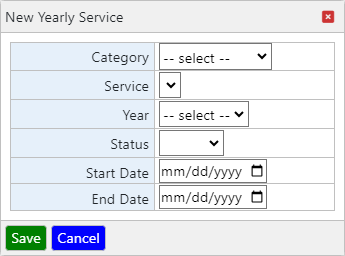
  • Project Tracking when a document is related to another service than a federal Tax Return.
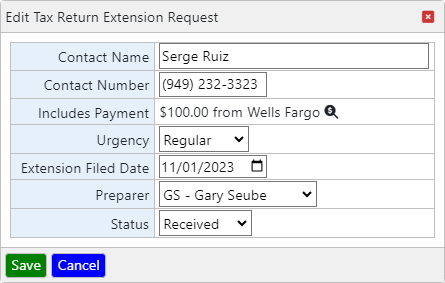
  • Tax Return Extension Request when a document is about an extension to a Tax Return.

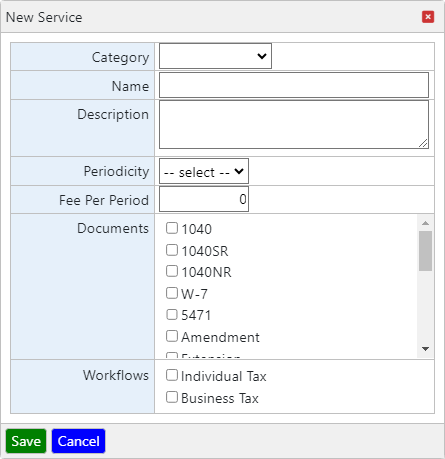
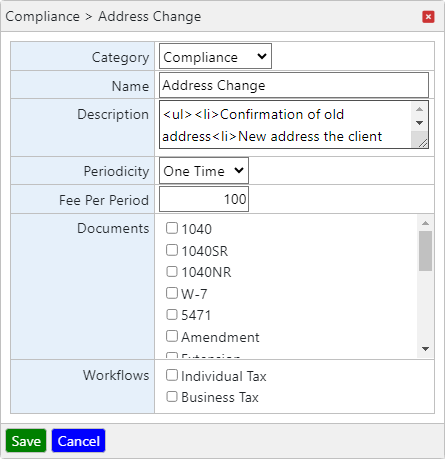
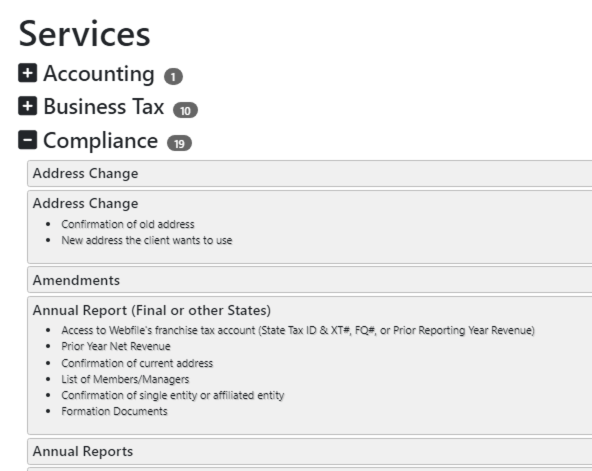
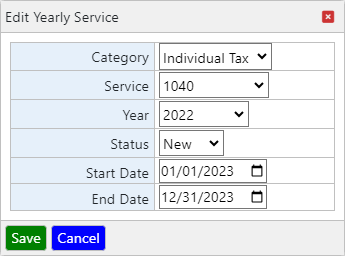
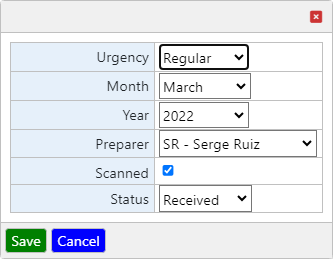
The category in which a dropped document fits will determine, if any, what other transaction it falls under, and additional fields will appear to allow the recording of both records at once.

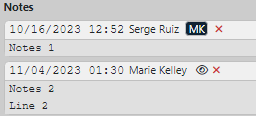
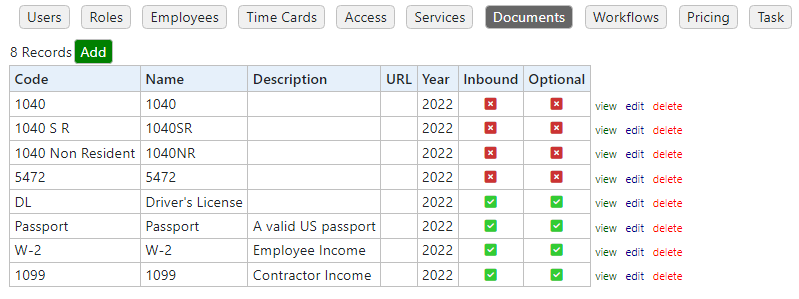
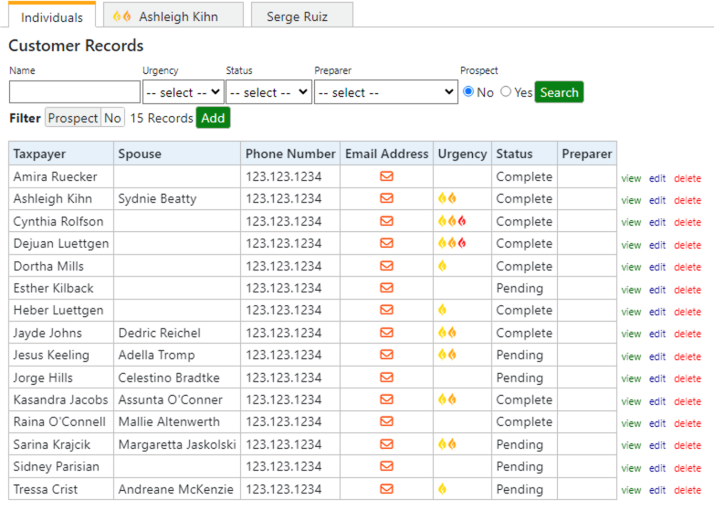
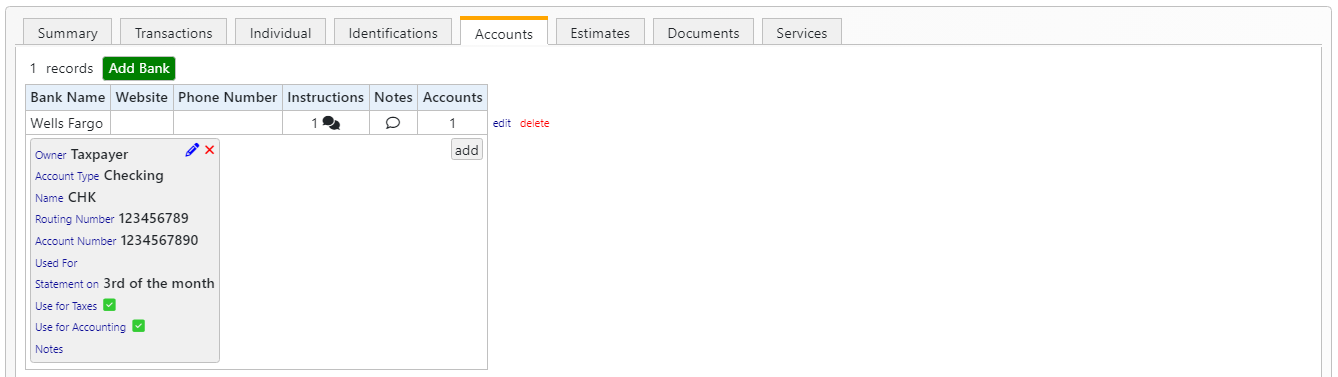
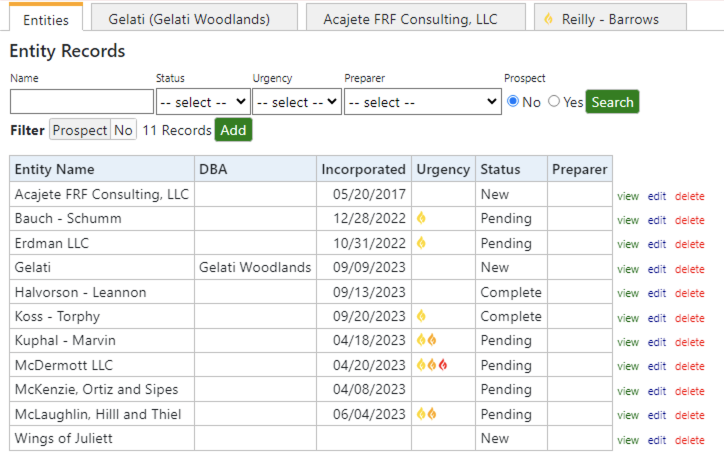
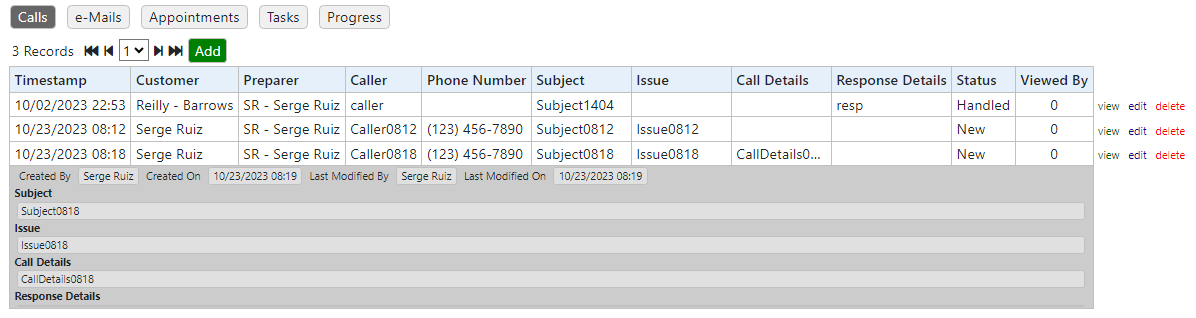
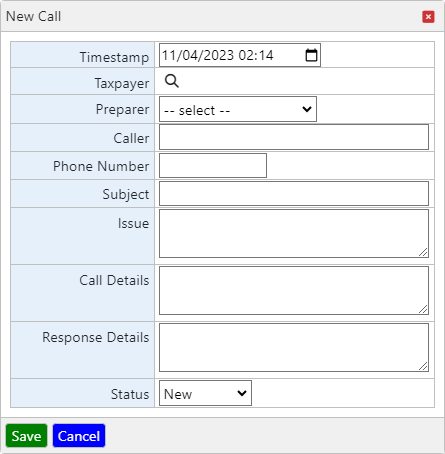
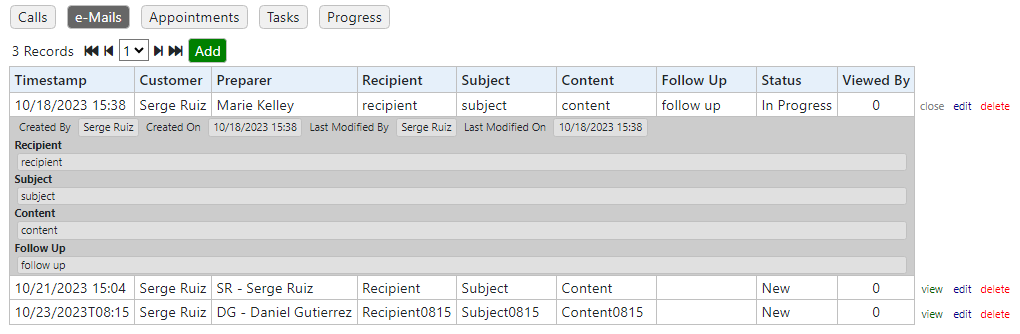
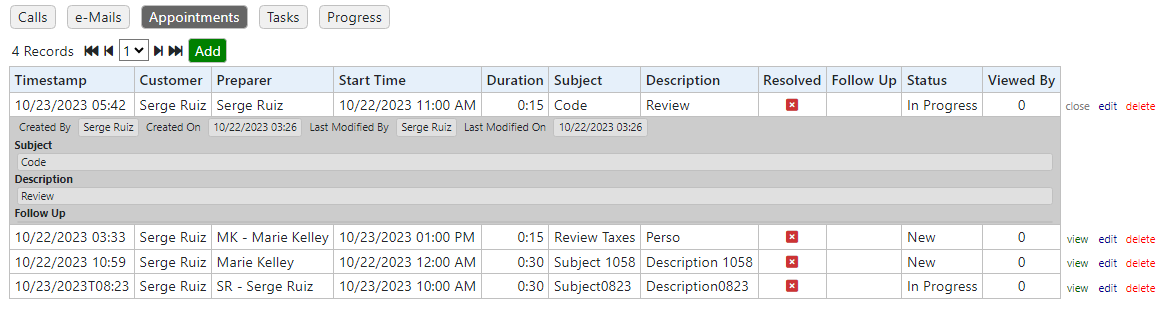
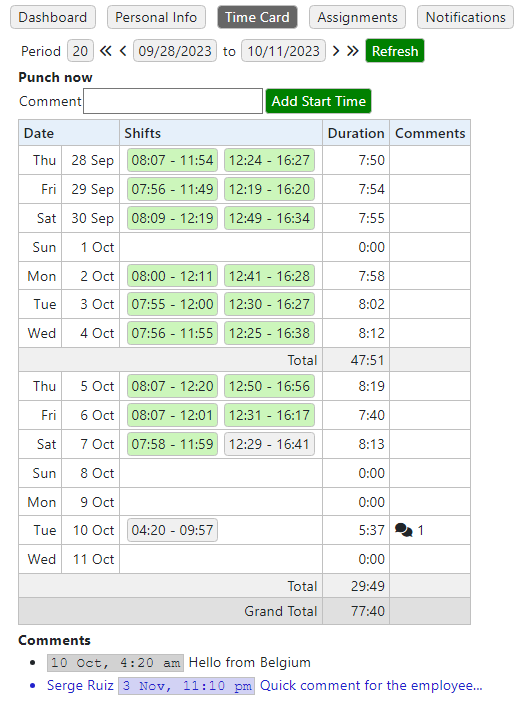
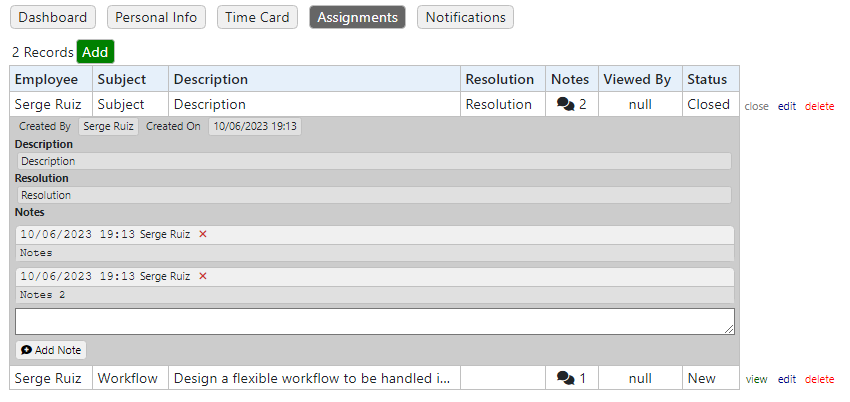
For all records in the lists below, the fields that can potentially receive a lot of data will be shown as an icon that hints to the size of its content.

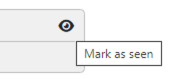
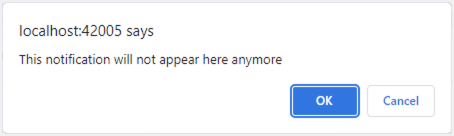
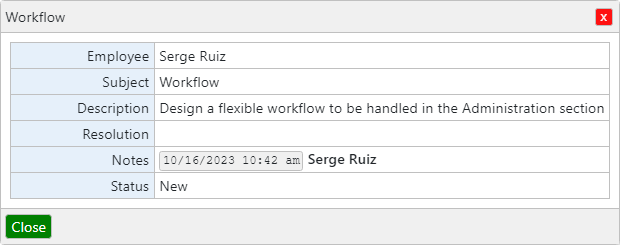
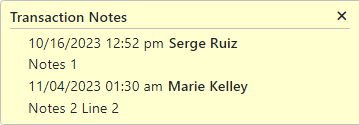
The view link will show the details of the transaction record and allow additional notes to taken, existing notes to be reported as seen, or notes to be removed under certain conditions.

Document Drop Off

Documents Dropped Off that have not been handled (the status is not "closed") are shown in the list.

Document Drop Off
Creating a new Document Drop Off

Editing an existing Document Drop Off

Notes
  • Date is automatically set at the time of creation but can be changed manually
  • Category select a category or add new ones through the "Other" option
  • Taxpayer the Customer for which the Transaction is targeted
  • Urgency the level of urgency
  • Notes the initials notes
  • Month the reference month of the document
  • Year the reference year of the document
  • Preparer the Preparer assigned
  • Scanned indicates that the Document(s) related to the Transaction has been scanned
  • Status the Status in which the Transaction is

IRS Notice

IRS Notice
Creating a new IRS Notice

Editing an existing IRS Notice

Notes
  • Date is automatically set at the time of creation but can be changed manually
  • Taxpayer the Customer for which the Transaction is targeted
  • Urgency the level of urgency
  • Notes the initials notes
  • Date of Notice the date on the notice from the authority that sent it
  • Description is an explanation of the content of the Notice
  • Tax Year the tax year for which the notice is destined
  • Preparer the Preparer assigned
  • Response Details is a description of the response provided
  • Status the Status in which the Transaction is

Tax Return Tracking

Tax Return Tracking
Creating a new Tax Return Tracking

Editing an existing Tax Return Tracking

Notes
  • Date is automatically set at the time of creation but can be changed manually
  • Taxpayer the Customer for which the Transaction is targeted
  • Return Type is the type of return that we are tracking
  • Contact Name is the name of the point person, if different from the Customer
  • Contact Number is the phone number of the such contact
  • Return Status is the Status of the Return
  • Urgency the level of urgency
  • Notes the initials notes
  • Preparer the Preparer assigned
  • Status the Status in which the Transaction is

Project Tracking

Project Tracking
Creating a new Project Tracking

Editing an existing Project Tracking

Notes
  • Date is automatically set at the time of creation but can be changed manually
  • Taxpayer the Customer for which the Transaction is targeted
  • Urgency the level of urgency
  • Notes the initials notes
  • Month the reference month of the document
  • Year the reference year of the document
  • Preparer the Preparer assigned
  • Status the Status in which the Transaction is

Tax Return Extension Request

Tax Return Extension Request
Creating a new Tax Return Extension Request

Editing an existing Tax Return Extension Request

Notes
  • Initial Request Date is automatically set at the time of creation but can be changed manually
  • Return Type is set initially and cannot be changed
  • Taxpayer the Customer for which the Transaction is targeted
  • Contact Name is the name of the point person, if different from the Customer
  • Contact Number is the phone number of the such contact
  • Includes Payment allows to create a payment information in a secondary form
  • Urgency the level of urgency
  • Notes the initials notes
  • Extension Filed Date is the date when the Extension was filed
  • Preparer the Preparer assigned
  • Status the Status in which the Transaction is
Creating a new Tax Return Extension Request

Editing an existing Tax Return Extension Request

Notes
  • Select Account select an account from the list of existing accounts. The icon is used to refresh the list of Accounts
  • Bank Name when a new account is selected from the drop down, a new account may be set here, but it won't be carried out to the list of Accounts
  • Routing Number is the routing number of the new account
  • Account Number is the account number of the new account
  • Keep in File is a flag to save this account for another use
  • Amount is the amount paid with the Extension Request

Call

Call
Creating a new Call

Editing an existing Call

Notes
  • Preparer pick a Preparer from the list
  • Caller free text field
  • Phone Number free field for a phone number
  • Subject free text field - it is used in other places to reference the Call, it should be short and meaningful
  • Issue describe the issue with all the details
  • Call Details add information about the Call that could be useful for the follow up
  • Response Details indicate what was told to the customer
  • Status pick the most relevant option

Email

Email
Creating a new Email

Editing an existing Email

Notes
  • Preparer pick a Preparer from the list
  • Recipient free text field
  • Subject free text field - it is used in other places to reference the Call, it should be short and meaningful
  • Content the body of the email
  • Follow Up indicate what to do next
  • Status pick the most relevant option

Appointment

Appointment
Creating a new Appointment

Editing an existing Appointment

Notes
  • Preparer pick a Preparer from the list
  • Start Time pick the date and time as hour and minutes, between 7am and 7pm
  • Duration pick from the list of durations by 15 minutes increment
  • Subject free text field - it is used in other places to reference the Call, it should be short and meaningful
  • Description the description of what the appointment is about
  • Resolved indicates if the issues discussed during the meeting where addressed
  • Follow Up indicate what to do next
  • Status pick the most relevant option

Task

Task
Creating a new Task

Editing an existing Task

Notes
  • Timestamp
  • Taxpayer
  • Preparer pick a Preparer from the list
  • Subject free text field - it is used in other places to reference the Call, it should be short and meaningful
  • Description
  • Completed On the date when the Task was completed
  • Status pick the most relevant option

Progress

Progress
Creating a new Progress

Editing an existing Progress

Notes

Personal Information

Personal Information
Protected

Open

Editing an existing Access

Notes
  • First Name free text
  • Last Name free text
  • Address
    • Street free text
    • Line 2 free text
    • City free text
    • State select from the list
    • Zip Code free text in the format of a 5+4 Zip Code
  • Comunication
    • Phone Number #1 select a type and enter a phone number in the proper format
    • Phone Number #2 select a type and enter a phone number in the proper format
    • Email Address free text in the format of an email address

Time Card

The Time Card page will open with the current Pay Period active.

If no period is pending for the day, the user may enter a comment and click the Add Start Time to create a new Work Period for the current day.

If a Work Period is open, the button will show as Add End Time, to which another comment may be applied.

When a Work Day contains 1 or more comments, an icon will appear and the detailed comments will be shown underneath.

The Administrator will approve the Work Periods. Once approved, they appear in green and hovering will show who made the approval.

The Administrator may also add comments, which appear in blue, with the name of the approver.

There is no limit to the number of Work Periods in a day.

Notification

We can see the list of initials of the users that have reported the Notification as seen.

Notification
Creating a new Notification

Editing an existing Notification

Notes
  • Subject free text that will appear in the upper part of the Notification
  • Description free text that will appear in the lower section
  • Start Date the start date when the message will appear
  • End Date the end date when the message will disappear

Assignment

Assignment
Creating a new Assignment

Editing an existing Assignment

Notes
  • Employee select the employee to which the Assignment will be set
  • Subject free text to indicate what the Assignment is about
  • Description free text to elaborate the details of the Assignment. This field is editable by all
  • Resolution free text to elaborate what was done to resolve the issue. This field is editable by all
  • Notes Independent Notes, available only upon the creation of the Assignment. Further Notes are created in the view panel
  • Status select the proper value according to the notes above, in other sections
Video